
How to Set Up Your First Glamping Site: A Step-by-Step Guide
Imagine waking up in the middle of a lush forest, sunlight filtering through canvas walls, with a hot cup of coffee in hand and birdsong as your morning alarm.
Welcome to glamping — the luxurious cousin of camping that’s taken the world by storm. With the right planning, even first-timers can enjoy a stylish, cozy outdoor adventure without sacrificing comfort.
This first-time glamping setup guide will walk you through every essential step to transform your dream escape into a real, unforgettable experience.
Choosing the Right Glamping Location
Location is everything in glamping. You want breathtaking scenery, but without sacrificing convenience or safety. Begin by considering the climate — a cool mountain breeze may sound romantic until temperatures drop to freezing at night. Also, assess accessibility: can your vehicle reach the site? Are the paths walkable with gear in tow?
Great beginner spots include state parks, private land with rentable sites, or designated glamping resorts that offer basic infrastructure. Be sure to check the legal requirements as public lands often need permits, and private properties may have zoning restrictions. Research is key to avoid last-minute surprises.
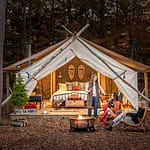
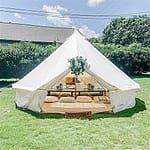
Selecting Your Shelter: Types of Glamping Accommodations
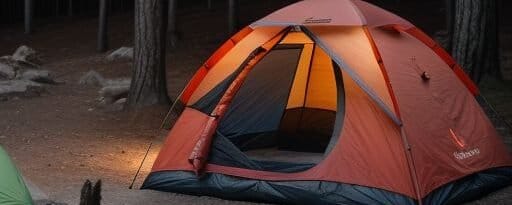
The shell of your glamping experience plays a major role in your comfort. Popular shelter options include canvas tents, yurts, geodesic domes, retrofitted trailers, and cozy cabins. For first-timers, a canvas bell tent is often recommended for its balance of space, ventilation, and easy setup.
Each shelter type has pros and cons. Yurts offer plenty of room but require a sturdy base. Trailers deliver mobility and weather protection but might need hookups. Tip: think about your destination’s climate and how much effort you can invest in setup versus comfort.
Essential Glamping Gear Checklist
To build an unforgettable first-time glamping setup, gear makes the difference between roughing it and relaxing. Below is a breakdown of must-have items:
- Shelter equipment: stakes, ground tarps, waterproof matting
- Bedding: air mattress, warm sleeping bags or duvets, extra pillows
- Lighting: solar lanterns, fairy lights, headlamps
- Furniture: camping chairs, folding tables, cozy floor rugs
- Cooking essentials: propane stove, utensils, pots and pans, cooler or mini-fridge
- Personal items: biodegradable toiletries, microfiber towels, bug spray, sunscreen
- Safety gear: first aid kit, fire extinguisher, solar-powered power bank
Packing efficiently and checking that everything works before departure can save you serious headaches.
Comfort and Aesthetics: Setting the Glamping Vibe
Glamping is just as much about the atmosphere as it is about the gear. Design your shelter’s interior with soft throws, layered rugs, and ambient lighting to create a snug haven. Think boho-chic meets rustic luxury.
Outside, create a lounge space with string lights, a hammock or stylish camp chairs, and a shaded area using a pop-up canopy. Music, books, and cards add to the evening unwind vibe. It’s these extra touches that make your site feel magical.
Building Your Glamp Kitchen Setup
Don’t let the outdoor setting limit your culinary creativity. Start with a propane or butane stove and add a compact grill or cooking grate for campfire meals. Stainless steel utensils and nesting cookware keep things practical and packable.
Store perishables in a cooler, ideally one with ice retention for multiple days. Bring large containers for fresh water and preplan meals to minimize waste. Cleanliness matters — set up a bin system for waste and reusable dishware cleaning with biodegradable soap.
Power and Lighting Solutions
Powering your glamp site doesn’t have to mean running noisy generators. Solar solutions are increasing in popularity for both eco-friendliness and ease of use. A solar generator like the Jackery Explorer series pairs well with foldable panels for charging essentials.
Use battery-powered or solar lights in different “zones” — soft string lights for interiors, pathway lanterns, and outdoor spotlights by the kitchen or fire area. This multi-layered lighting approach reinforces mood and functionality.
Bathroom and Sanitation Options
Privacy and hygiene are top concerns, even while glamping. Pop-up privacy tents pair well with a portable toilet or composting bin for zero-impact waste handling. If you prefer more comfort, there are chemical toilet setups with disposable liners.
Solar showers warm up during the day and offer a refreshing rinse after hikes or swims. Pack extra biodegradable soap and sanitizers to keep things fresh. According to Leave No Trace principles, always dispose of greywater responsibly and maintain cleanliness at your site.
Setting Up Your Site: Step-by-Step Instructions
- Clear and level the ground: Remove debris and check for roots or rocks where you’ll pitch your shelter.
- Pitch your tent or structure: Follow manufacturer instructions and secure with extra guy lines for wind protection.
- Arrange bedding: Inflate mattresses, lay out rugs and organize cozy layers.
- Establish kitchen and dining: Set up stove, food prep area, and shaded dining.
- Set up sanitation area: Place portable toilet and shower in a discreet corner, protected by trees or privacy screens.
- Organize lighting and power: Place solar panels and lights strategically to charge devices and illuminate the space.
- Add final touches: Hang lights, set out chairs, add decor to make it feel like home.
Safety and Maintenance Tips
Fires are part of the glamping charm, but safety is key. Use fire rings where available, and always have water or a fire extinguisher nearby. Never leave a fire unattended, and check local regulations before lighting anything.
Store food in sealed containers to avoid wildlife visitors. If in bear country, lock food in your vehicle or use bear-proof bins. Weatherproofing your gear with tarps or rain covers helps avoid soggy surprises. Keep your site tidy with daily maintenance to protect nature and your comfort.
Top Mistakes to Avoid on Your First Glamping Setup
One common pitfall is overpacking — bringing too much makes transport and setup exhausting. On the flip side, underpacking critical items like warm bedding or lighting can ruin the vibe. Testing your gear before the trip helps avoid surprises.
Another mistake is picking an inconvenient or unpleasant location. Triple-check weather, amenities, and accessibility. Lastly, it’s easy to forget the importance of stellar comfort touches — don’t leave behind that extra blanket or dreamcatcher!
Final Checklist Before You Go
Print a checklist of essentials and do a test setup in your backyard if possible. This will help you visualize the layout and identify missing gear. Confirm any permits, reservations, or vehicle access ahead of time.
A quick packing inventory: shelter, bedding, kitchen gear, lighting, sanitation solutions, safety equipment, and decor. Tick items off as you go to ensure nothing is forgotten.
Conclusion
Glamping allows you to enjoy the great outdoors without sacrificing your creature comforts. With the right approach, gear, and planning, your first excursion can be smooth, relaxing, and downright magical. As glamping guru Sarah Riley once said, “It’s not just luxury in a tent—it’s how we reconnect with nature on a deeper level.”
Share your favorite glamping tip or snap of your setup in the comments below. There’s no wrong way to glamp — just make it yours. Happy glamping!
Resources & FAQ
- REI – Recommended outdoor gear for glamping
- Glamping Hub – Find glamping spots worldwide
- Beginner FAQ: Is glamping safe? Yes, with proper safety gear and awareness. What’s the budget version? Try tent + cozy bedding + string lights.
“`